Do you take a lot of screenshots? Me too! This short guide describes my optimized workflow for screenshot capture & sharing; it could save you minutes per day. Then you can go get yourself another cup of coffee with all that new free time.
The method described below is DEEPLY indebted to the brilliant Dan Hon, via this tweet:
I've run with his brief guidance and made a full-fledged, detailed step-by-step guide for my coworkers. And for you. Because I love you and I want you to be happy!
Why take screenshots?
Screenshots are helpful to illustrate lots of things! You can...
Attach them to bug reports.
Use them in your favorite messaging app (like Slack) to help a colleague understand what you’re talking about.
Slice them apart or annotate them to convey potential changes or new ideas.
Caveats
These instructions are for Mac only. If you’d like to provide tips for screenshotting on PC, write me back or leave a comment. This guide is not for you.
How it works
Learn your keyboard shortcuts!
On a Mac, there are three and a half important keyboard shortcuts to learn.
Command + Shift + 3 captures all of your screens. This is a quick way to screenshot what you’re looking at, but almost certainly requires cropping after the fact.
Command + Shift + 4 opens a rectangle selector (by default) that allows you to click and drag to capture a specific part of the screen. This is my go-to key combo for quickly capturing bits of screenshots.
Command + Shift + 4, then spacebar, toggles to a per-window selector. Hover over any window (e.g. your web browser) to capture the whole window including app chrome.
Command + Shift + 5 opens a fairly powerful Screenshots interface — here, you can access some options about how screenshots are captured (more on this below), as well as initiate a screen recording. Screen recordings can be helpful for demonstrating bugs or other specific issues.
Note: I’ve never wanted to change the default key combinations for taking screenshots, but if you do, you can go to System Preferences > Keyboard > Shortcuts and set up your own:
Put screenshots in a folder
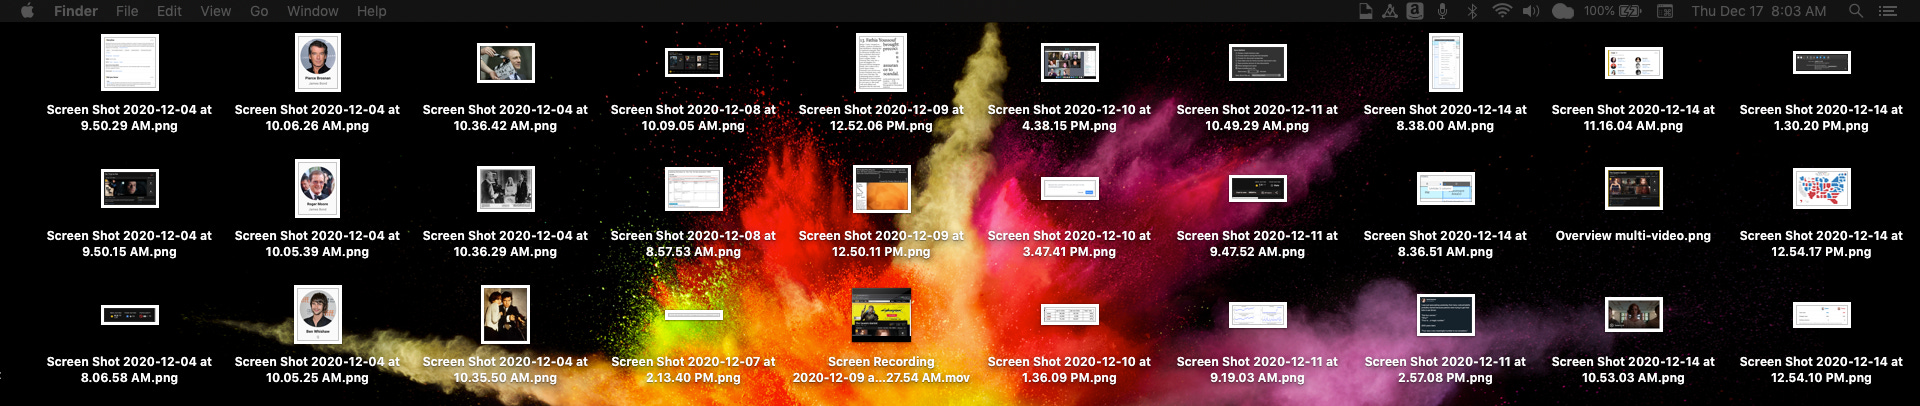
By default, Mac screenshots are saved to the desktop. Don’t end up like this. No one wants this.
Instead, create a folder where you’d like to save your screenshots. This can be on your local machine, or for bonus points and automatic backups, sync your local folder to a cloud storage service like Google Drive or Dropbox.
Then:
Hit Command + Shift + 5 to bring up the Screenshot interface.
Under Options, select Save to > Other location... and select the folder you created in the step above.
From now on, when you capture a screenshot or screen recording (via any of the key combos above) they’ll automatically be saved to this folder.
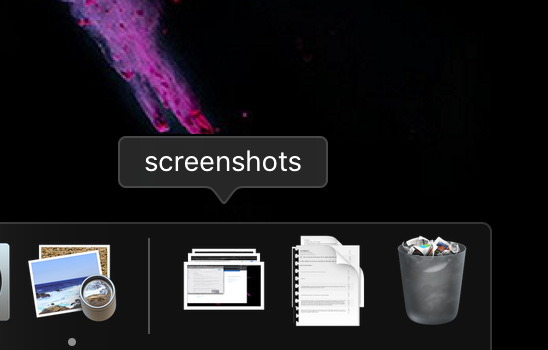
Put the new folder in your Dock
Find your new folder, then drag it into the right-hand section of the Dock. (Or bottom-end if you’re a left-or-right-Dock-sider, I suppose.)
Your screenshot folder lives here now.
Right-click or Ctrl-click it, then select:
Sort by > Date Modified
Display as > Stack
View content as > Grid
Grid view looks like this when you left-click on your screenshots folder:
Put it all together
You’re ready to capture. Your workflow will now look like this:
Invoke a screenshot, e.g. with Command + Shift + 4.
Drag to select the portion of the screen you want to capture.
That capture will automatically go in your screenshots folder.
Click the folder icon in the Dock to see your recent screenshots.
Click the first item in the grid to open the screenshot in Preview (to annotate, crop, etc.) or
Drag it into your chat, Slack channel, email, or bug report as an attachment.
This whole workflow could take as little as 10 seconds when you’re up to speed. Reduce repetitive steps. Save yourself time. (Get that coffee.) Communicate more quickly and clearly with your colleagues. Profit. (Spend the profit on coffee.)
Best practices
Do make the screenshot include relevant details, including the broader context if helpful — like where a particular issue appears on a webpage.
Don’t include anything in a screenshot that you don’t want your audience to see. This could include irrelevant or unhelpful information, or at worst, confidential details. Crop is your friend.
Know better?
If you have additional tips, reply to this email or, wait for it, there’s a fancy button for this:
Personally, I'm an avid user of Shift + Cmd + Control + 4. It copies the screenshot to your clipboard, then you paste it using Cmd+V wherever you want to drop it! Keep in mind this does *not* add it to your desktop or any folder, which is oftentimes preferred as I just need it for the one particular use (but may be problematic if you want to reference it quickly later). The maneuver turns your hand into quite the claw, but my muscle memory now kicks in and handles it like a champ.


Personally, I'm an avid user of Shift + Cmd + Control + 4. It copies the screenshot to your clipboard, then you paste it using Cmd+V wherever you want to drop it! Keep in mind this does *not* add it to your desktop or any folder, which is oftentimes preferred as I just need it for the one particular use (but may be problematic if you want to reference it quickly later). The maneuver turns your hand into quite the claw, but my muscle memory now kicks in and handles it like a champ.
Screenshots for Windows? Windows key + Prt Sc
Where does it go? User folder -> Pictures -> Screenshots
That's all I got.